Superior Parts: ART and Stereolithography
 ART's
Stereolithography (SL) service uses the most advanced technology and
equipment to deliver highly functional, remarkably accurate prototypes,
faster than ever.
ART's
Stereolithography (SL) service uses the most advanced technology and
equipment to deliver highly functional, remarkably accurate prototypes,
faster than ever.
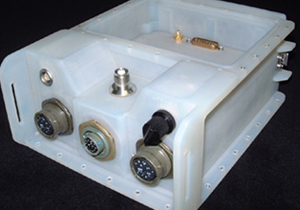
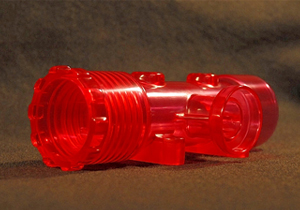
With SL, we can build exact replicas of computer solid models within hours, by solidifying a liquid photo-curable resin, layer by layer, with a UV laser.
Many of ART’s prototype projects include parts with geometry that would be classified
as small to medium in size, but we can also build large patterns such as 36-inch
satellite dishes and 16-inch SUV tires. The current state-of-the-art SL equipment
can build parts as big as 29 x 25 x 21 inches in a single piece.
We use only superior, remarkably versatile Somos resins in our stereolithography
machines, which are staffed by highly experienced hands. Our craftsmen and engineers
have spent years mastering the science and art of producing exceptional SL models.
The result? Superb SL prototypes that are ready for form/fit testing and limited-functional testing. They are also ideal for engineering reviews and marketing evaluations. SL models also serve as “master patterns” in many secondary operations, including:
- Silicone molding
- Nickel plating
- Investment casting
- Plaster and sand casting
 The Stereolithography Process: Step by Step
- 1) A platform, mounted to a z-axis traversing elevator, is positioned within the vat of photo-curable resin.
- 2) Support structure is created to anchor the soon-to-be-built part to the platform, providing a flat surface for part building.
- 3) A 3-D solid model is "sliced" into horizontal cross-sections with thicknesses that correspond to the build layer thickness (typically 0.004 inches).
- 4) The UV laser traces each cross-section over the surface of the photocurable resin. Stepper motor driven mirrors control the movements of the laser.
- 5) After each layer is traced, the elevator is lowered into the vat to allow resin to cover the layer that was just solidified.
- 6) A sweeper blade moves across the vat, to ensure a smooth flat surface in preparation for the next build layer.
- 7) The process starts all over, with the next cross-section being traced on the surface of the resin.
- 8) When all the cross-sections have been traced, the elevator raises the platform out of the resin.
- 9) The solid model drains until removed for post-processing